The yellow bathroom

The bathrooms in our new house are very dated.  As in 1960 dated.  As in yellow dated.  I mean YEEEEEEEEEELLOW dated.

Well only the first level is yellow.  I have a pink monster on the second floor.  Haha!  So not kidding.  I guess back in that time when everything was psychedelic, bathrooms were meant to be very monochromatic.  The yellow bathroom is yellow everything.  Yellow tile, yellow backsplash, yellow sink, yellow toilet, yellow tub, yellow walls and yellow fixtures.  You get the picture now??

We aren’t doing too much to the bathrooms other than some minor cosmetic touchups.  Since our main goal is to renovate the kitchen before we move in (done solely by a licensed professional), Mr. P and I decided to tackle our first ever DIY project in the house.  DUN DUN DUNNNNNNNNNN (loud piano music playing)!!!! It was great!  I swear.  He’s handier than I thought and we didn’t even argue!  Odd.  (Side note: I’m super particular and my way is the only way).

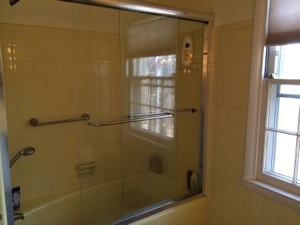
On our first DIY attempt, we wanted to remove these glass sliding doors that were molded into the tub and wall.  This would then break up all the yellow tile and allow us to bring more color to the room.  This seemed like a very straightforward task.  I googled and watched some YouTube videos on what we needed to do.  I also read a great post from Young House Love about their experience removing their sliding doors.  If you haven’t read it yet, you should!  There are some graphic pictures though.

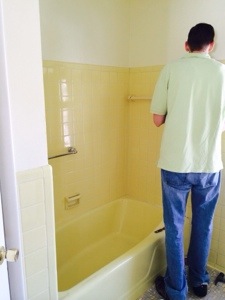
Step 1, we got down and dirty and started to remove the caulk.  It was very easy.  It’s funny because we were so timid at first with our hammer and scrapers.  We didn’t want to damage the walls or anything.  But a few minutes into it we were hammering away!  The two side rails came up quickly but we got a little stuck trying to pull the rail from the actual tub.  Mr. P had one of those claw things trying to pull the sucker. It finally gave way and I was prepared to see the moldy mess that was to sicken me.  But it wasn’t there!!!  We didn’t see any mold, mildew or green grossness at all!  Those builders back then sure knew craftsmanship!

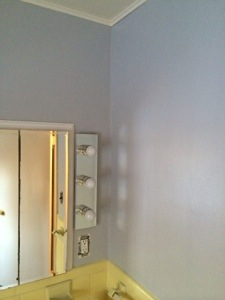
After we cleaned that up we prepped and painted the walls a very light gray color by Valspar in Gravity.  We figured if we have to live with a yellow bathroom for a while, and the fact that all of our guests will use that bathroom, we had to bring it into the 21st century somehow.  Gray is SO in right now, I’m kind of obsessed.  We added two coats of the gray and it looks great so far!  Granted it was night time, but so far we love!

Next up – I’d like to replace the light fixtures above the vanity but I’m kind of terrified that one of us will get electrocuted.  Baby steps???  In the meantime we will repaint the cabinet, replace the vanity mirror, and my dad is going to help us change out the toilets.  There’s no way my bum is sitting on that 50 year old toilet!!  This should be interesting though, Papa bear and Mr. P bonding over a toilet.  As my dad would say, “OH SHIT!”

Below are some photos that we took of our progress.
20140220-094107.jpg
Before
:  This glass mirrored door was very 60s and had to go!
20140220-094212.jpg
After
: We removed the door to modernize the bathroom.  We’ll put a new shower curtain that can breathe life into the room but also to minimize all that yellow!
20140220-094234.jpg
Before
:  Yellow everything!

20140220-094257.jpg
After
:  We painted the walls grey to create a more colorful space.   Don’t the walls almost have a purple hue to them?  I need to see the space in the day time (photo credit: Mr. P)

20140220-094327.jpg
After
:  This is a night photo (with some accidental filtering I left on the camera).  The tiles aren’t that yellow but you can see it changes up the room already with just a little paint.

carnitas tacos

Mr. P and I have a fondness for pigs.  That is we like to eat them.  What’s not to love about a pig?  It is the “other” white meat and pretty awesome at that!  If you eat a chop or tenderloin, it is very low in Weight Watchers points and super lean!  I’m not sure how WW friendly this meal is though…

We eat pork at least once a week so I like to mix it up here and there.  Mr. P’s sister and brother-in-law gifted us half of a pig and lamb for Christmas this year so we’ve got pork coming out of my you know where.  But it is SO delicious!  It’s very fresh due to the animals being grass fed.  Or that they don’t eat that weird feeder stuff.  You may need to Google this one.

I found a pork shoulder in our freezer so decided to attempt making carnitas.  (I’ve actually made this twice now it’s that good.)  In my first try, I placed the shoulder (with bone) into a slow cooker and covered it with water and some vinegar, along with a quartered onion, garlic cloves, cumin, bay leaves, salt and pepper for several hours on low.  Once it was done I just shredded it with a fork and served it up.  This was good, but it still didn’t have that pork taco taste that one usually gets at a Mexican joint.

In attempt #2, I wanted to try true carnitas versus plain ol’ pork tacos.  If you don’t have a slow cooker, you can still cook the pork in about an hour!  Just cut up your pork into 1-2 inch cubes and cover the pot with just enough water along with the other ingredients mentioned above.  Bring it to roaring boil and skim off any weird foam that might come to the surface.  You can place it on simmer with the lid partially covered OR stick it in the oven at 325 degrees for about 60-90 minutes.

I preferred finishing it in the oven because I didn’t want to have my gas stove on for so long.  Totally up to you!  Also, based on how small you cut your pork up will determine the cooking time.  The smaller the cubes the faster it cooks.

Once the pork is tender, take pieces of the pork (you may want to do a rough chop if you don’t want them super big) and return it to a pan, cooking until all the liquid is evaporated and it gets a nice crisp brown color on all sides.  You shouldn’t need to add any oils to the pan since there should be some remaining fat on the pork.  And there you have it!  Carnitas.  I served mine with some mango salsa, shredded lettuce, cheese and hot sauce.   So easy!  Tadaaaaaaa!

Pork Carnitas ~ Ingredients:
–  2 pounds boneless pork shoulder, cut into 1 to 2-inch chunks
–  1 large white onion, quartered
–  2 bay leaves
–  5 cloves of garlic, smashed
– 2 tablespoons of ground cumin
–  salt and pepper

Instructions:
1. Preheat the oven to 325 degrees

2. Combine all of the ingredients in a dutch oven and add water to cover.  Bring it to a boil and skim and weird foam that may come to the surface.  Once at a boil, transfer the pot to the oven with the lid on for about 60-90 minutes (when the pork is tender).

3. Break or roughly chop the meat into bite size pieces and add to a hot pan.  Cook until all the liquid is evaporated and the meat has crisped and browned on all sides.  This should only take a few minutes and be sure not to hoard the pan.  No oil should be needed due to the little bit of fat on the meat.

4. Serve on a soft tortilla and top with your favorite toppings!

Mango Salsa ~Ingredients:
– 2 mangos, ripened and cut into ½ inch chunks
– ½ cup of diced red onions
– ½ cup of diced red, yellow, or green bell pepper
– 1 minced jalapeno, adjust to your taste
– ¼ cup or more chopped fresh cilantro leaves
– 1 tablespoon of olive oil
– 1 whole lime, juiced
– salt and pepper to taste

Instructions:
1. Put all the ingredients into a medium sized bowl and combine.  Serve immediately or refrigerate for a few hours.

Mango salsa.  YUM!

photo 1

Carnitas taco

photo 2 (1)

Savory Goodness

photo 3

all grown up.

It is finally official!  After years, maybe eons, of renting we have finally pulled the trigger and bought our first home!!  Hooray!  If Arsenio Hall were here, he would fist pump and say “HOO HOO HOO.”

We’ve lived in the city the past 10 years and love the easy accessibility we have to restaurants, shops, bars, parks, etc.  We walk a ton during the summer and its so easy to take cabs, or UBER, everywhere.  But one thing we knew… we didn’t want to buy in the city.  No disrespect to my city homeowners!!  I love the city!!!  I still plan on hanging out downtown on the weekends.  But the taxes are crazy high and the public school system isn’t up to par (in my opinion).  This and other factors led to the decision of moving out a little further into the “county.”  We now have trees galore, a yard AND parking!!  Parking is key if you’ve ever lived in the city.

So let’s rewind…  The past month had included so many sleepless nights.  I don’t know about you, but when I buy something I get really REALLY excited.   Like can’t sleep, obsessed excited.  I just want to play with my new toy!  At nights I laid tossing and turning thinking about kitchens, paint colors, design layouts, etc.   Next thing you know its 5am and the alarm would be going off in another 3 hours.  Yes, I wake up late for work J

Funny as it may sound, until the day we put an offer in our house I had never watched a lick of HGTV or DIY network.  The day after we put the offer in… I watched it 8 hours straight.  We are trying to DIY a little and save some money.  I need ideas!!!  We’ve quickly become fans of the Property Brothers, Rehab Addict and Matt from Bath Crashers.   The other night I had a dream that the Bath Crasher’s guy Matt decided we were worthy of a redo!  Sadly… just a dream.

I’ve also become a pinning machine.  I hadn’t been on Pinterest in quite some time; it had lost its luster after our wedding.  So once we bought the house, I renewed my love for it.  There are SO many pictures and ideas on there!  Seriously you can find ANYTHING on there.  I’m slightly obsessed; I have the phone app and am on there all day long.

We have tons of ideas and as my dad said… one project at a time.  Even though the inner me wants to do EVERYTHING at once!!  First things first! The kitchen, floors and paint.  Oh and also the bathrooms, shutters, front door and ….  J  I’m just so excited that we have something that is finally ours.  No more renting.  We can do whatever we want and design the house to fit our personalities.

We are SO excited to have a home of our own FINALLY! YAH us!!!

Stay tuned for more home updates.

PS.  Don’t worry, I’m still cooking up a storm but just haven’t posted any recipes recently.  I swear, check my phone and you’ll see tons of food pics.  I hope to post more often but we’ll see.

20140211-192900.jpg